Document Object Model (DOM)

Abbreviations
*[CSS]: Cascading Style Sheet
*[DOM]: Document Object Model
*[HTML]: Hypertext Markup Language
*[JS]: JavaScript
Introduction to the DOM
Goals
Understand what the DOM is
Select HTML elements using document methods
Compare and contrast elements and nodes
In this subunit, we'll give you an introduction to what the DOM is and how it's created! We'll start with a conceptual overview of the Document Object Model and then move to more technical concepts like selecting elements in the DOM by id and class. We'll finish up with some hand-on practice exercises, so you can apply these concepts yourself. * Once you grasp these DOM basics, you can start doing more complex and interesting DOM operations, which you'll start working on in the next subunit*.
What is the DOM?
Document Object Model
It is the programming interface for HTML
A representation of our HTML that can be accessed using javascript
How does it get created?
When a web page is loaded, the browser creates the DOM for that specific page
This allows for the creation of dynamic web pages where users can interact with the page
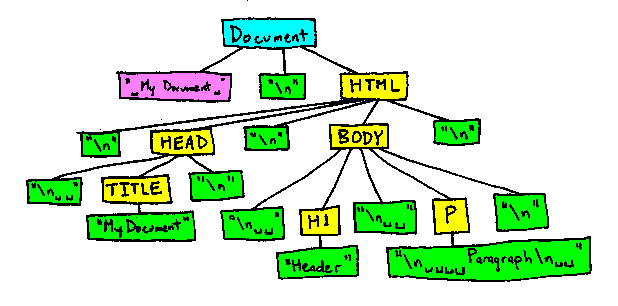
What does it look like?
THe DOM under the hood
The structure of the DOM uses something called a tree, where the topmost mode is the document object.

Using the document object
the document object represents teh web page that has been loaded
it acts as the "starting point" for access to the DOM.
The things we can do with the document object
Finding elements
Making new elements
updating elements
Changing properties on elements
Listening for events like clicks
Selecting Elements in the DOM
How to Select Elements in the DOM
To access the DOM, we make use of the document object.
This object has properties and functions that we use to access our HTML elements which we can manipulate with javascript.
Different Methods
javascript has quite a few different methods for selecting elements in the DOM
We're going to be starting with one method call getElementById.
getElementById accepts a string which is the name of an id in the DOM.
It finds the first matching id
What do we get back?
We get back a special object called an HTMLElement.
The exact kind of object we get back depend on what we select (HTMLDivElement vs HTMLParagraphElement)
This special object contains quite a few helpful methods that we will see later!
getElementByTagName accepts a string which is the name of an element in the DOM.
It returns a list of all the elements that match the string passed to the function
What do we get back?
This function returns an HTMLCollection to us!
It looks a lot like an array, and you can access it at a specific index or use a for loop
However, you can not use common methods like push, pop, indexOf or includes
getElementByClassName accepts a string which is the name of an element in the DOM.
It returns a list of all the elements that have a class attribute, which matches the string passed to the function
What do we get back?
Just like getElementByTagName, we get back a special kind of array called an HTMLCollection.
Don't get too caught up in the difference between an array and an HTMLCollection, just know that you can not use almost all array methods on these special collections.
querySelector accepts a string which is a valid CSS selector
It returns the first element that matches the CSS selector passed to the function.
Just like getElementById, this function returns a special HTMLElement object to us.
querySelectorAll accepts a string which is a valid CSS selector.
It returns all the elements that matches the CSS selector passed to the function.
What do we get back?
This function returns a NodeList to us!
It looks a lot like an array, and you can access it at a specific index or use a for loop
However, you can not use common methods like push, pop, indexOf or includes
It's almost identical to a HTMLCollection except it can include special kinds of nodes. You will not need to worry about this for now!
DOM Manipulation
Now that we know how to select elements - let's change them!
Don't worry it's not permanent
Modifying Properties with innerText
Recap
The DOM allows is to use javascript to manipulate HTML
We can use methods like
querySelectorto access elements on the pageUsing the DOM we can modify elements and attributes
Modifying the DOM
Goals
Modify the text adn HTML of elements using
innerTextandinnerHtmlChange inline styling of an element using the style object
Modify attributes using
getAttributeandsetAttributeTraverse, create, append adn remove elements from the DOM
Selecting elements using JavaScript is just the tip of the iceberg when it comes to the DOM. Now that you can select elements, you'll learn how to manipulate them any way you see fit.
In this subunit, you'll learn how to change just about everything in the DOM. You'll add, append, remove, and modify elements and their contents. By the end of the subunit, you'll be able to perform the most common operations in the DOM.
Modifying Elements in the DOM
Accessing text
The easiest way to access the text of an element is to use innerText
Modifying text
If you need to change any text, you can assign a new value to the innerHtml:
Using textContent
Another common way to access and modify text is to use the textContent property
So what's the difference?
There are quite a few small differences:
innerTextis aware of the rendered appearance of text, whiletextContentis not.textContentgets the content of all elements, including<script>and<style>elements. In contrast,innerTextonly shows “human-readable” elements.depending on the complexity of the content inside an element,
innerTextcan be a bit less performant thattextContentfor now, you can use either, but be aware that both exist!
Accessing HTML
If you need to access the HTML of an element, you can use innerHTML. This will include all the elements inside of the one you select.
You will yourself using innerText more commonly, there are some security concerns when using innerHTML if you're not careful.
Modifying HTML
If you need to change any HTML, you can assign a new value to the innerHTML:
Another reason it’s less common to use innerHTML is that you need the string to be valid HTML for everything to work, which can be quite tedious to build
Modifying styling
Aside from the text or HTML of an element, it’s very common that you’ll want to change the inline style for an element.
You can access any inline CSS properties on an element using the style property
To change the style, simply reassign the value of the CSS property
How about background color?
Let’s go and change the background-color CSS property:
Make sure to camelCase!
Modifying Attributes
So far you’ve seen how to modify HTML and text.
The third most common thing you’ll be modifying are attributes for an element
To do that, we can get attributes using getAttribute and modify attributes using setAttribute
Attributes
As a quick refresher, attributes are part of every HTML element that modify an HTML element.
An attribute either modifies the default functionality of an element type or provides functionality.
src
href
class
id
type
value
In order to access an attribute on an element, you can use the getAttribute method
To set an attribute on an element, you can use the setAttribute method
Direct attribute access
There are a few attributes that you can directly access and modify as well instead of having to use getAttribute or setAttribute.
One of those is id
A more common one you will use is the value attribute with forms in HTML
Manipulating classes
We have quite a few ways to manipulate the class attribute in JavaScript:
setAttribute(“class”)- this will override the classclassName- this will give you a string representation of the classclassList- this will give you an array-like object to add, remove or toggle classes
setAttribute(“class”)
If you want to access the class attribute you can use getAttribute(“class”) or the className property.
this works, but will overwrite the previous class
You can also add a class by reassigning the className property
An easier way to interact with classes on an element is to use the .classList method
Changing Multiple Elements
Now that you’ve seen how to modify styles, attributes, and text. How can we modify multiple elements at once?
How it's done
To do this we need to loop over multiple elements!
Working with the DOM
Creating Elements
To create an HTML element, we can use the createElement function and pass in the name of the element
This just makes an empty element, so if we want to add any text, attributes or styling we will have to do that on another line
Appending Elements
After you create an element, you need to place it in the DOM to see it. You can do this using the append method.
append is a method that a parent element calls, and you pass in the child element that you would like to place inside of the parent element
append will place the element as the last child in the parent. If you would like the element to be the first child, you can use the prepend method.
Removing Elements
If we want to remove elements in the DOM, we can use the handy remove method.
In order to remove an element, we first need to find it.
This function can only be called on a single element, so if you need to remove multiple elements you’ll need to call remove multiple times.
Finding elements near another element
As you start adding and removing elements in the DOM, there are times when you might want to know not only information about an element, but it’s parents or children.
You might want to:
find an element and remove some or all of its children
find an element and add an element to one of its children
Thankfully there are some very helpful methods for doing just that!
Setting the stage with some HTML
demo/traversal-methods/index.html
Take a look at some parent, child, and sibling element relationships.
We will be focusing specifically on the <div> element.
Accessing a parent element
If you want to access the parent element of another element, you can use the parentElement method.
Accessing the children of an element
If you want to access the child elements of another element, you can use the children, firstElementChild or lastElementChild methods.
Accessing the siblings of an element
If you want to access the previous sibling or next sibling element of another element, you can use the previousElementSibling or nextElementSibling method.
Text Nodes
You may come across other methods for finding things in the DOM, we have shown you the most common ones, but as you learn more you may come across something called a text node
Nodes Vs. Elements
With some of these finder methods, you will see that you don't always get back an HTML element, you sometimes get back what is called a text node
Everything in the DOM is a node, some nodes are not actually HTML elements, but text or even comments!
With most of the common traversal methods, you will not need to worry about text nodes
You will be using other methods less frequently, but know that they exist if you need to see elements near/above/below the element you find.