How to Implement Linked Lists with Test Driven Development
incomplete?
Introduction
Linked lists are one of the most popular data structures interviewers ask about in technical interviews. You will probably never have to implement one in a real day-to-day job, but knowing how to write a linked list and understanding how they work is crucial to passing a technical interview.
On top of covering linked lists in this tutorial, I will also be covering how you can use test driven development to make writing code easier. We will be designing the entirety of the linked list with test-driven development (TDD) to show you how to write better tests.
How to do test driven development
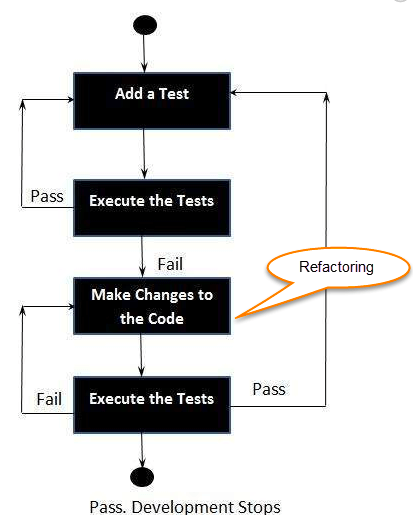
Create precise tests: Developers need to create precise unit tests to verify the functionality of specific features. They must ensure that the test compiles so that it can execute. In most cases, the test is bound to fail. This is a meaningful failure as developers are creating compact tests based on their assumptions of how the feature will behave.
Correcting the Code: Once a test fails, developers need to make the minimal changes required to correct the code so that it can run successfully when re-executed.
Refactor the Code: Once the test runs successfully, check for redundancy or any possible code optimizations to enhance overall performance. Ensure that refactoring does not affect the external behavior of the program.
The image below represents a high-level TDD approach towards development:

Image taken from Browserstack.com
What a linked list is?
alternative to an array data structure
both are linear data structure
an array is list of objects with each object accessed by an index starting at 0 and going to n-elements and contains a finite number of elements that is defined at creation
a linked list on the other hand does not have indexes for its stored elements, it stores an object similar to an array, however, instead of a consecutive index numbers, the node (element) has a reference to the next node in the list
linked list is basically a group of nodes where each node points to the next node by means of a pointer
node is composed of data and a reference to the next node
start off with a head node (first or 0 element), it has its value and the reference to next element only
tail node is the very last node, it stores data and reference points to null
each node after the head node will also have its value and a reference to next node and so on
eventually it ends with the tail node where it also has its value but does not have any reference to a next node
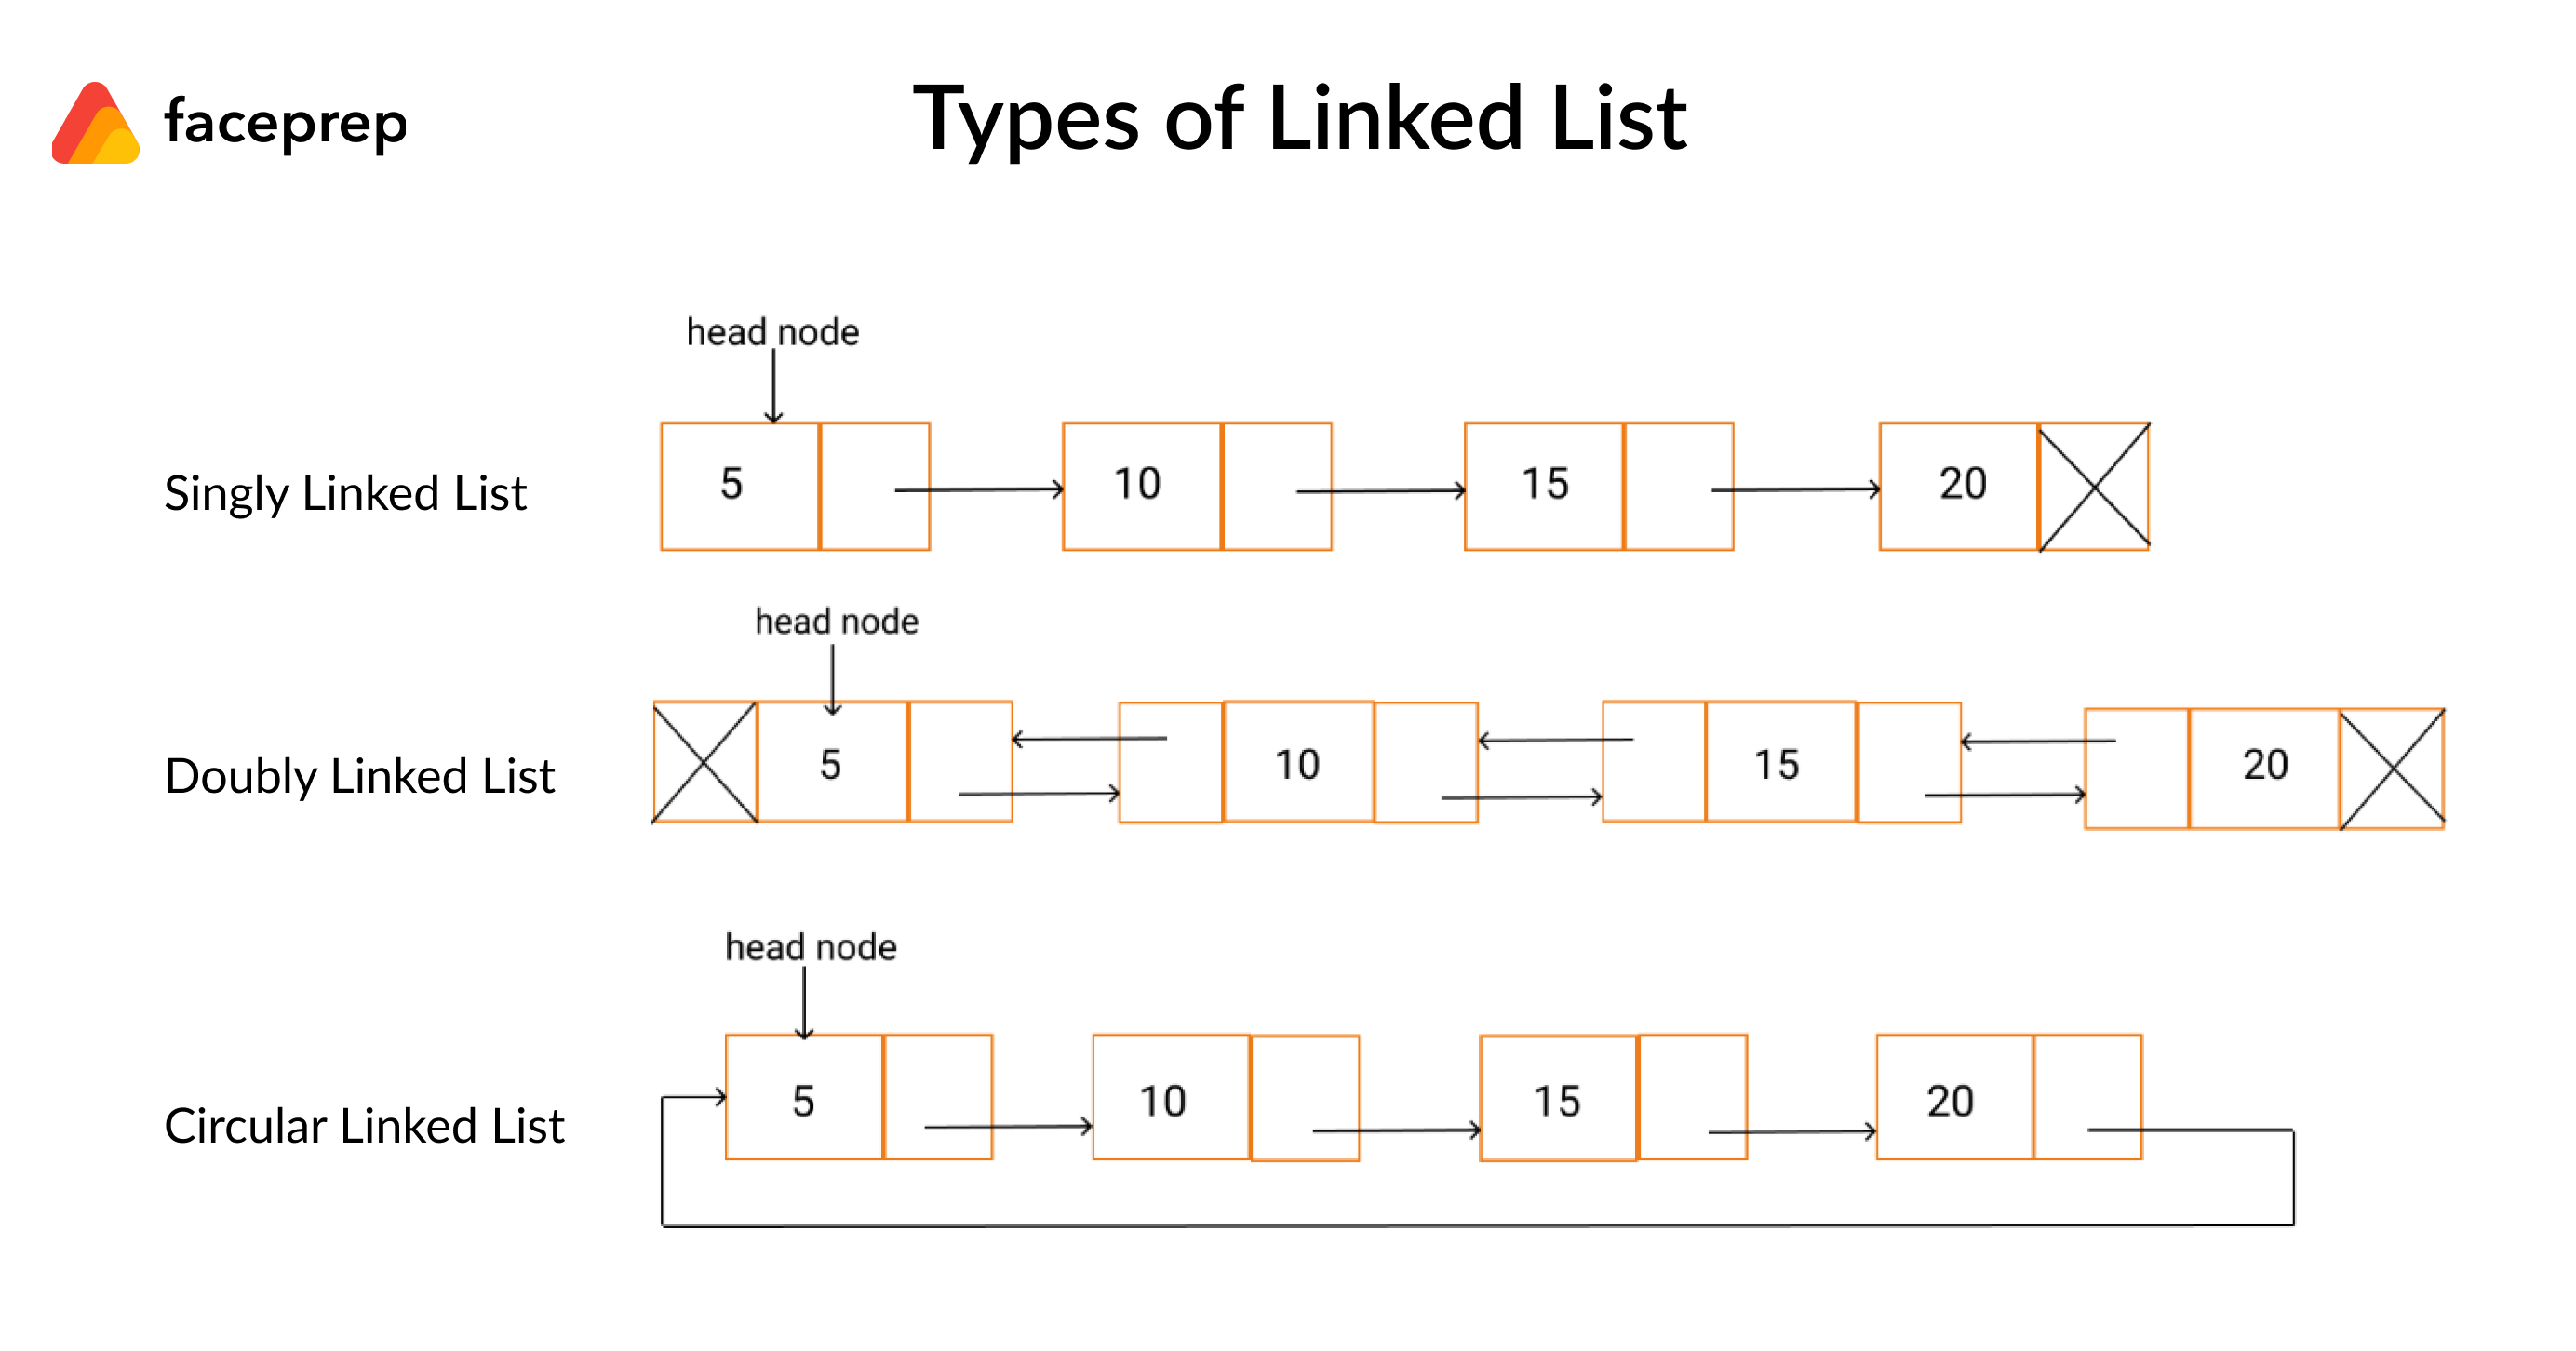
three type of linked lists
singly linked list—each node references the next node except for the tail node which ends the list
doubly linked list—each node references the next node and its previous node except for the head node which starts the list
circular linked list—this is similar to a singly linked list except the tail node references back to the head node

Why use a linked list instead of an array?
one advantage of linked lists is that elements can be added to it indefinitely without reallocation or reorganization of the entire structure because that data items need not be stored contiguously in memory. An array on the other hand will eventually get filled or have to be resized for making an insertion whenever needed (a costly operation that isn't always possible)
elements are also be easily removed from linked lists whereas removing elements from an array leaves empty spaces that are a waste of computer memory or performing a shift operation in arrays increases the cost thus makes it expensive
linked lists are more efficient with adding and removing elements than arrays
add an element at the beginning: array you can do this but you have to move existing first element down a position which in turn every other element also must move down (O(n) time because who have to loop through all existing elements) whereas in a linked list you can simply create the node, give it a reference to the existing head node and now the new node becomes the head node (O(1) time)
now if you are not operating on the first element of a linked list then it becomes O(n) time because you have to start with the first node and traverse through the list to the node you want conversely much quicker to get random elements in an array because you pass in the index of the element you want
Operations of Linked Lists
Insertion—inserts an element at specified positions in the list
Deletion—deletes an element at specified positions in the list
Search—searches an element using the given value
Update—update an element at specified position with the given value
How to create a linked list
make project folder and cd into it
initialize npm
this will set up the initial project structure and create package.json
install jest as a development package
Create linkedList.js
Create linkedList.js
Step 1. create a `LinkedList` class and export it so the automated tests can access it
Step 2. create an `constructor();` method with no parameters because we want to create an empty linked list by default
Step 3. inside the constructor method create two references
Step 3a.`this.head = null;`—beginning or first node of a linked list
Step 3b.`this.length = ;.` - time saver so we can keep track of the length and not have to loop through it every time to determine the length
Step 4. create another class `LinkedListNode` for the node itself or just create a normal js object `linkedListNode ={value: null, next: null};` **note:** for consistency better to go with option 1
Step 5. create a `constructor(value, next);` in the node class
Step 6. create `insertAtHead(data)` method in the linked list class
Step 7. inside the `insertAtHead()` method create a newNode
Step 7a. pass in data and `this.head` since this is going in front of the head
Step 8. then set head to `newNode` and 1 to length
Step 9. perform first manual test in `app.js`
create linkedList.test.js for automated testing and to drive writing the file
Create linkList.test.js
Step 1. import LinkedList class `const LinkedList = require('./[LinkedList](/javascript/data_structures/linked_lists_with_TDD/notes/linkedListjs.md)');`
Step 2. write a describe block `describe('#insertAtHead'() => {});`
Step 2a. first parameter is a string of the name of the method/function to be tested - '#' is just a convention to be used when testing a method of a class
Step 2b. second parameter is callback function that contains all the test information we want
Step 3. inside of callback function create first test `test('adds node to beginning of the list', () => {});`
Step 3a. similar to the describe block first parameter is a string saying what the test does and second parameter is another callback function that contains the code to run to test whatever we want to test
Step 4. to run the tests inside the `package.json()` file and replace existing test script with `"jest --coverage"`
then run test
create
app.jssee we can run code to manually test thelinkedListfile
Create app.js
import LinkedList `const LinkedList = require('linkedList.js');`
create a new linked list `const ll = new LinkedList();`
insert value 10 at the head `ll.insertAtTheHead(10);`
insert value 20 at the head `ll.insertAtTheHead(20);`
log 'll' to console `console.log(ll);`
run app.js `node app.js`
go to `linkedList.test.js`
go to
linkedList.jsfor remaining instructions
From here on out you write tests, test by npm run test, tests should fail and then write the method based on your test cases, run the tests again npm run test and now they should pass - keep doing this until you have created all your methods you need to write.
How to write proper tests
go to
linkedList.test.json writing tests